Showing posts with label Stock. Show all posts

Saturday, April 25, 2015

Tagged under: , , , , , , , , ,

EMINENCE UI | Galaxy young GT-S6312 | MOD


Hello Every one i'm back with a new UI MOD for Samsung Galaxy young Duos this one is Called
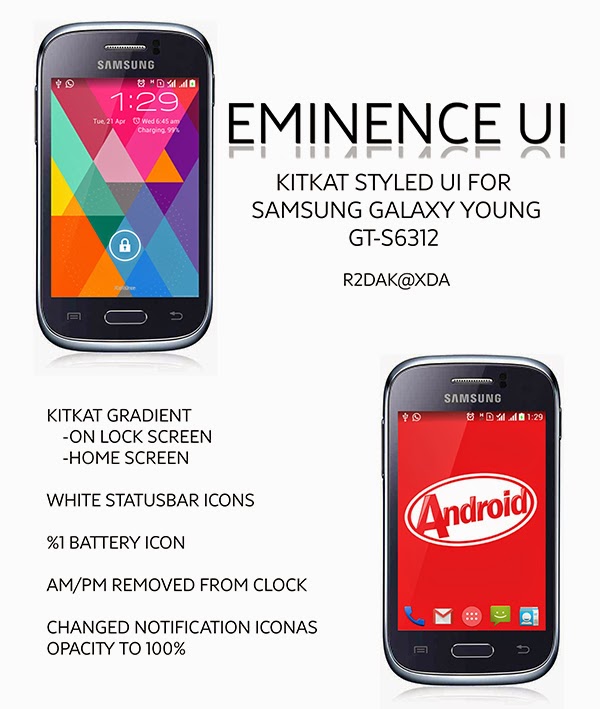

Eminence UI
Eminence UI


FEATURES:
-x-Kitkat Gradient
-Lock Screen
-Homw Screen
-x- Status bar icons themed to White
-x- %1 Kitkat Battery Icon
-x- Notification icons opacity changed to 100%
- AM/PM Removed from Clock
-x- Kitkat Tiles
-x- SIM Switcher moved to a Tile
-x- Live Battery And Wifi Tiles
-x- Working Flash
-Tiny FlashLight Required to use it
-x- Themed Lidroid Toggles
-New Icons
- Toggle Text Removed
-x- Clear Notification Moved to top

BUGS
-x- sometime gives FC when you tap on wifi or battery live tile
-x- let me know if you found any

Tips
the colour of Status bar on lock-screen can be changed to full transparent (looks really beautiful ) use gravity box to add transparency

WHAT YOU NEED:
-x- A Rooted Galaxy Young Duos GT-S6312
-x- Stock Deodexed Rom
-x- ClockworkMod Recovery (CWM)

INSTALLATION:
-x- Download the EMINENCE_UI.zip from Attachment and place it into your SD card.
-x- Reboot into RECOVERY (CWM OR TWRP) (Volume up+ Home + Power).
-x- select EMINENCE_UI.zip From SD Card >Choose YES- Install EMINENCE_UI.zip
-x- Reboot
Enjoy

Monday, January 27, 2014

Tagged under: , , ,

Download Stock ROMs for Galaxy Young GT-S6312

Galaxy young stockrom

Welcome here are some resources from where  you can download the latest STOCK ROMS for your Galaxy Young GT-S6312, first here is some info about the stock roms

What is a Stock ROM?

Stock ROMs are the ones which come by default in Android phones or tablets. These are customized versions of Android done by mobile companies to make their devices unique in looks and features.

Warranty

Stock ROMs doesn't void your warranty. One of the biggest reasons that people don’t go for Custom ROMs is warranty. Most of the companies prohibit rooting your Android phone or installing a custom Android version – and if you do so, then you can void/lose your warranty.

Premium Apps

Stock ROMs usually come with loaded premium apps which are built by mobile companies to attract customers. These apps can be anything like music players, widgets, live wallpapers, etc. Premium apps are provided to enrich the user’s experience of the customer. These apps differ from one mobile vendor to another and sometimes, even from model to model – more or better apps as the price of the device goes high. For example, Sony Xperia phones have TrackID which can be used to get information about an unknown playing music; Samsung Galaxy S3 has S Voice, a virtual assistant app just like Siri (available in iPhone 4S); etc.

Premium Features

Android in original form is cool, but mobile vendors hardly think so – they try to improve it in terms of features and looks. Stock ROMs comes with lots of premium features which are not available in Custom ROMs (at least not for free). These features include custom home screen or launcher or app drawer, e.g., Sony Xperia phones have TimeScape UI whereas Motorola phones have Blur UI. For example, most Android phones come with keyboard with Swype feature using which you can type a word with a single tap on the touch screen by just swiping your finger across each letter of the word and keyboard automatically guess the correct word

Trust for Security

May be it feel strange but one can easily trust Android operating system sold by a reputed company. You can be sure that it does not contain any backdoor, malwares, spywares or other malicious tools. I’m not saying you can’t trust Custom ROM but it’s just that many people take their privacy on top of all other things – you can easily trust a reputed company you know but how can you trust a software or source code of unidentified origin or developer.

INU VS INS 

if you are from India there will be two version of Roms INU and INS, these are product code, AKA region code.You can check it on Your device's salesbox or through kies. there is no major difference between INU ans INS Roms. the only thing is if You are on INU region  you  won't get OTA update of INS region  release.same with INS.

Checking on Sales Box

Galaxy young stock rom

Checking on Kies

just connect your phone to kies and it will show you the product code


Download

Some Sites which hosts the Stock roms, you can use any of the them to download,just open the links and select your country, my personal favorite is SAMMOBILE but you have to make a account to download from SAMMOBILE,

Since we are talking about STOCK ROMs, why don't you take a look at how to FLASH  them 

Tagged under: , , , ,

Flashing Stock ROM to Samsung Galaxy Young


this guide is tested by me and its 100% working

To Flash ROMs to Samsung Galaxy Young we are going to use a program called ODIN

What is ODIN?

ODIN is a third-party, Windows-based program created specifically to flash files such as ROMs on Samsung smartphones. ODIN is used in several different circumstances, such as flashing firmware or installing a custom ROM on the smartphone. ODIN has no special requirements beyond the Samsung USB drivers,

How to Setup your phone for Flashing 

  •  Install USB drivers for your device on your PC. You can download and install Samsung Kies which will automatically install device drivers.
  • Be sure to backup your data including Contacts, SMS / MMS, APN & MMS Settings as well as photos and videos stored on your device’s internal or external storage.
  •  Make sure that your device is well charged. Ideally, the battery level should be around 60-80%. The more the better.
  • USB Debugging should be enabled on your device.
  •  Make sure that Samsung Kies is not running.

Note: Installing official firmware / stock ROM does not involve much risks most of the time. However, try this at your own risk. We will not be responsible for any hard done to your device.

Flashing Stock ROM to Samsung Galaxy Young

Step 1:
Download the official firmware zip package for your device. Then extract the downloaded zip file.
After extracting, you will either get one .tar / .tar.md5 file or will get multiple files.
  • If you get one file , it will have everything inside it: PDA + Phone + CSC.
  • If you get multiple files , there will be separate files for PDA, Phone & CSC.

Step 2:
Download Odin 3 v3.09  and extract the downloaded zip file. You will get following files:
ODIN FILES

Odin3 v3.09.exe
Odin3.ini

Step 3:
Right click on Odin3 v3.09.exe and run it as administrator to start Odin.

Step 4:
Boot your device in download mode. For most Samsung devices, you will need to do this Switch your device off. 
Press & hold Power + Home + Volume down buttons till you see a triangle and Android robot.
Now press the Volume up button to confirm entering the download mode.

Flashing Stock ROM To Samsung Galaxy Young:Download mode

Step 5:
Once it is in download mode, connect your device to the computer via USB cable.

When your device is connected, one of Odin ID:COM boxes will turn yellow and display the COM port number. See the screenshot below:


Flashing Stock ROM To Samsung Galaxy Young

Important: If you do not see the port number in any of ID:COM boxes or if the box does not turn yellow, please do not proceed and check if the USB drivers are installed correctly and the device is connected via USB. If you do see the message, it means that your device was detected successfully by Odin and you can now flash any firmware files onto your device using Odin.

Step 6:
If the firmware zip package had just one file, click on AP button, then browse and select the firmware file (.tar or .tar.md5).

OR

If the firmware package had multiple files:
Click on AP button, then browse and select the file that has CODE/PDA/AP in its name.
Click on CP button and select the file that has MODEM in its name.
Click on CSC button and select the file with CSC in its name.

Skip any files that you did not find in the package.


Flashing Stock ROM To Samsung Galaxy Young


Step 7:
Make sure that you do not mess up with checkboxes:
Auto Reboot and F. Reset Time checkboxes should be selected
All other checkboxes should be unchecked.

Step 8:
After selecting the appropriate files, click on “Start” button in Odin.

This will kick off the process to flash the ROM. Please do not disconnect your device during the process.


Step 9:
Once flashing is complete, your device will reboot. You can now disconnect from the PC and start using it.


Flashing Stock ROM To Samsung Galaxy Young

That’s it. You can use these steps to flash ROM on your Android device using Odin.

---UPDATE----

the Odin has been updated to v3.09, there has been few UI changes
Bootloader is now BL
PDA is now AP
PHONE is now CP
Only CSC, UMS and PIT are not changed.

Our Video on How to Flash Stock Rom


A Beginner’s Guide on Odin Buttons & Checkboxes:

Flashing Stock ROM To Samsung Galaxy Young


Odin is a very useful tool that communicates with connected Android device (in download mode) and lets you install / flash ROM on your Android device. It’s an internal Samsung tool that is used for flashing firmware on devices. It’s available for Windows only. It’s very important to understand Odin and know about all the options that the program offers. Here is everything you need to know about the tool.
What is Odin?

Odin is a tool developed by Samsung to be used internally. It is used to flash firmware onto Android devices. You can flash .tar, .tar.md5 or .bin firmware files using Odin. There are different versions of Odin available. You can choose one depending on your device.


Understanding Odin Options

First, lets see what does the checkbox options do:

Auto Reboot: This option, when checked, reboots the system automatically after flashing is done.

Re-Partition: So, what does re-partition do in Odin? It repartitions your device filesystem to the default (RFS).

F . Reset Time: It resets the flashing timer after the flash process is complete.

And here is what different buttons mean and what they are used for:

PIT: Partition Information Table. If you checked the “Re-Partition” checkbox, you should also specify a .pit file to repartition the file system.

BL : This button is used to flash the device Bootloader.

AP : It refers to the firmware build. You can use this button to select the ROM or Kernel that you want to flash on to your device.

CP : It refers to baseband / modem version.

CSC: Consumer Software Customization. Click this button and select the CSC file. It contains region or carrier specific files and may also include APN / MMS settings for that carrier.

Please be aware that you need to be very careful while using Odin. Especially with “Re-Partition” option you need to select the right PIT file. If you do not have the right .pit file, do not check “Re-Partition” option as it may brick your phone.

You need to select the right file against each button. Click on the button, browse and select the appropriate file. These files are usually found inside a firmware zip package. If used carefully and in the right way, Odin is very handy tool.